
PRE-REQUISITI
– Server con installato Ubuntu 16.04.2 LTS Codename:Xenial
– La versione di osTicket che installeremo è la Core v1.10
INSTALLAZIONE NGINX, MYSQL e PHP 7
Prima di iniziare, si consiglia di aggiornare il sistema con l’ultima versione stabile.
Accedere con l’utente di sudo e eseguire i seguenti comandi per aggiornare il sistema.
|
0 |
sudo apt-get update -y |
|
0 |
sudo apt-get upgrade -y |
In primo luogo, è necessario installare Nginx, MySQL, PHP, PHP-FPM e altri moduli PHP richiesti nel sistema.
È possibile installarli tutti con il seguente comando:
|
0 |
sudo apt-get install -y nginx mysql-server php7.0-cli php7.0-mysql php7.0-cgi php7.0-fpm php7.0-gd php7.0-imap php7.0-xml php7.0-mbstring php7.0-intl php-apcu -y |
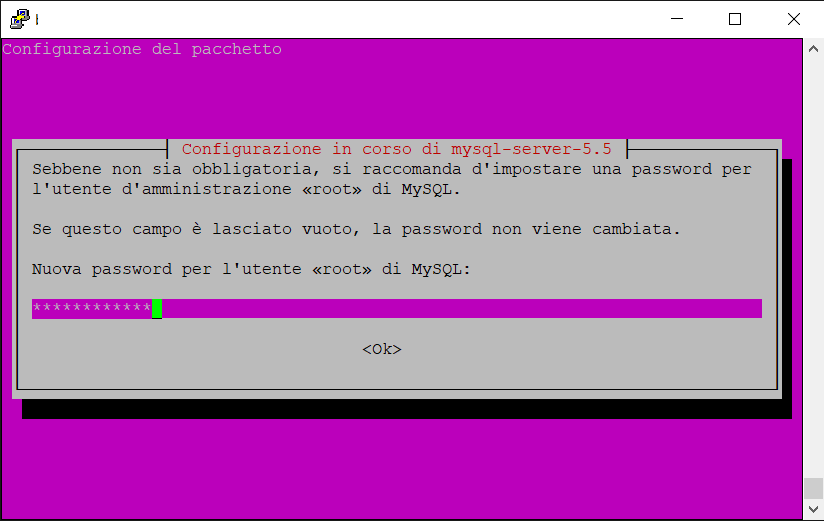
Inserire la password di root del MySQl Server e cliccare OK
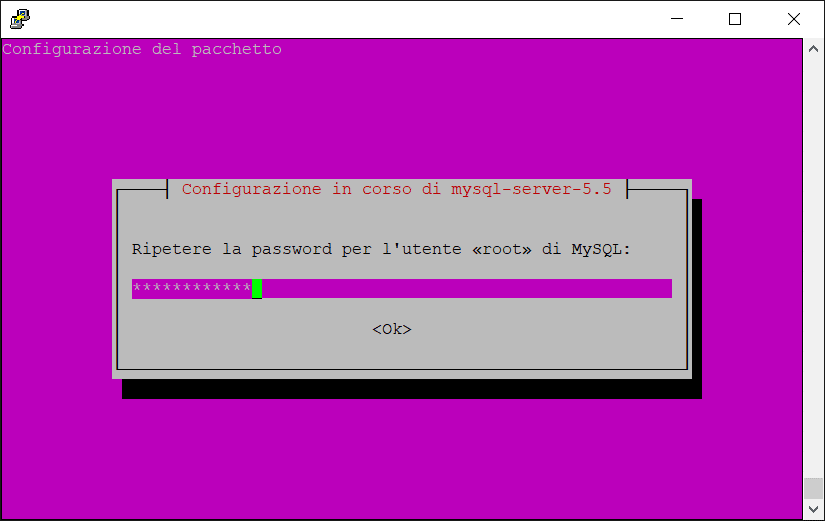
Reinserire la password e cliccare su OK
Adesso facciamo partire Nginx e MySQL e impostiamo la partenza all’avvio del server con i seguenti comandi:
|
0 1 2 3 |
sudo systemctl start nginx sudo systemctl start mysql sudo systemctl enable nginx sudo systemctl enable mysql |
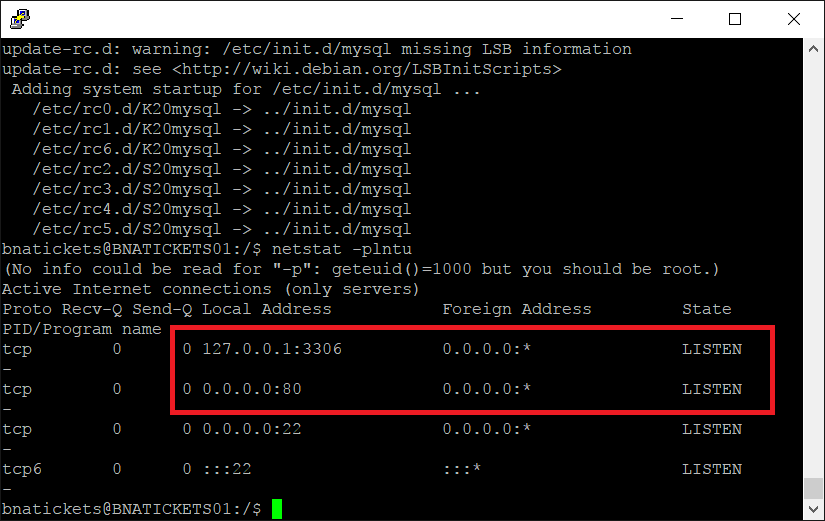
Assicurati ora che tutti i servizi siano in esecuzione controllando la porta del server dei servizi:
|
0 |
netstat -plntu |
Dovremmo vedere una schermata come quella sovrastante
Verrà visualizzata la porta 80 utilizzata da Nginx e la porta 3306 utilizzata dal server MySQL.
Adesso è necessario modificare il file php.ini lanciando il comando:
|
0 |
sudo nano /etc/php/7.0/fpm/php.ini |
Decommentare la seguente riga e modificare il suo valore da 1 a 0:
|
0 |
cgi.fix_pathinfo=0 |
Salvare e chiudere il file, quindi riavviare il servizio php7-fpm e fare in modo che parta all’avvio:
|
0 1 |
sudo systemctl restart php7.0-fpm sudo systemctl enable php7.0-fpm |
CONFIGURAZIONE DEL DATABASE PER OSTICKETS
Per impostazione predefinita, MySQL non è protetto.
È possibile assicurarlo eseguendo lo script mysql_secure_installation con il comando:
|
0 |
sudo mysql_secure_installation |
Rispondi a tutte le domande come indicato di seguito:
- Would you like to setup VALIDATE PASSWORD plugin? [Y/n] Y
- There are three levels of password validation policy:
LOW Length >= 8
MEDIUM Length >= 8, numeric, mixed case, and special characters
STRONG Length >= 8, numeric, mixed case, special characters and dictionary
Please enter 0 = LOW, 1 = MEDIUM and 2 = STRONG: Selezionare il numero che si desidera (Io di solito inerisco 0=LOW)
Estimated strength of the password: 50
3. Change the password for root ? ((Press y|Y for Yes, any other key for No) : Scrivere Yes per cambiare la password di root del Database
4. By default, a MySQL installation has an anonymous user,
allowing anyone to log into MySQL without having to have
a user account created for them. This is intended only for
testing, and to make the installation go a bit smoother.
You should remove them before moving into a production
environment.
Remove anonymous users? (Press y|Y for Yes, any other key for No) : Y
5. Normally, root should only be allowed to connect from
‘localhost’. This ensures that someone cannot guess at
the root password from the network.
Disallow root login remotely? (Press y|Y for Yes, any other key for No) : Y
6. By default, MySQL comes with a database named ‘test’ that
anyone can access. This is also intended only for testing,
and should be removed before moving into a production
environment.
Remove test database and access to it? (Press y|Y for Yes, any other key for No) : Y
7. Reloading the privilege tables will ensure that all changes
made so far will take effect immediately.
Reload privilege tables now? (Press y|Y for Yes, any other key for No) : Y
Quando tutto è fatto, connettersi con shell MySQL con il seguente comando:
|
0 |
mysql -u root -p |
Inserisci la password, quindi crea un nuovo database e un utente per osTicket:
NOTA BENE: copiare tutta la riga compreso il punto e virgola e al posto della parola password inserire la password da assegnare all’utente osticket
|
0 1 2 3 4 |
mysql> create database osticketdb; mysql> create user osticket@localhost identified by 'password'; mysql> grant all privileges on osticketdb.* to osticket@localhost identified by 'password'; mysql> flush privileges; mysql> exit; |
INSTALLAZIONE OSTICKET
In primo luogo, è necessario creare una directory per osTicket:
|
0 |
sudo mkdir /var/www/html/osticket |
Quindi, modificare la directory su osTicket e scaricare la versione più stabile di osTicket con i seguenti comandi:
|
0 1 |
cd /var/www/html/osticket wget http://osticket.com/sites/default/files/download/osTicket-v1.10.zip |
Prima di scompattare il file .zip installiamo l’utility unzip con il seguente comando:
|
0 |
sudo apt-get install zip unzip |
A questo punto possiamo estrarre il file scaricato con il comando:
|
0 |
sudo unzip osTicket-v1.10.zip |
Successivamente, copiamo il file di configurazione di esempio con il comando:
|
0 |
sudo cp upload/include/ost-sampleconfig.php upload/include/ost-config.php |
Modificare il proprietario di tutti i file e directory di osticket per l’utente e il gruppo “www-data”.
|
0 |
sudo chown -R www-data:www-data /var/www/html/osticket |
CONFIGURARE NGINX PER OSTICKET
Sarà necessario creare una nuova configurazione host virtuale per osTicket:
|
0 |
sudo nano /etc/nginx/sites-available/osticket |
Aggiungere le seguenti righe
|
0 1 2 3 4 5 6 7 8 9 10 11 12 13 14 15 16 17 18 19 20 21 22 23 24 25 26 27 28 29 30 31 32 33 34 35 36 37 38 39 40 41 42 43 44 45 46 47 48 49 50 51 52 53 54 55 56 57 58 |
server { listen 80; server_name nome-server.dominio.com; root /var/www/html/osticket/upload/; access_log /var/log/nginx/access.log; error_log /var/log/nginx/error.log; index index.php; client_max_body_size 2000M; client_body_buffer_size 100M; client_header_buffer_size 10M; large_client_header_buffers 2 10M; client_body_timeout 12; client_header_timeout 12; keepalive_timeout 15; send_timeout 10; gzip on; gzip_comp_level 2; gzip_min_length 1000; gzip_proxied expired no-cache no-store private auth; gzip_types text/plain application/x-javascript text/xml text/css application/xml; set $path_info ""; location ~ /include { deny all; return 403; } if ($request_uri ~ "^/api(/[^\?]+)") { set $path_info $1; } location ~ ^/api/(?:tickets|tasks).*$ { try_files $uri $uri/ /api/http.php?$query_string; } if ($request_uri ~ "^/scp/.*\.php(/[^\?]+)") { set $path_info $1; } location ~ ^/scp/ajax.php/.*$ { try_files $uri $uri/ /scp/ajax.php?$query_string; } location / { try_files $uri $uri/ index.php; } location ~ \.php$ { fastcgi_param SCRIPT_FILENAME $document_root$fastcgi_script_name; include fastcgi_params; include snippets/fastcgi-php.conf; fastcgi_pass unix:/run/php/php7.0-fpm.sock; fastcgi_param PATH_INFO $path_info; } } |
Salvare e chiudere il file, quindi attivare l’host virtuale con il seguente comando:
|
0 |
sudo ln -s /etc/nginx/sites-available/osticket /etc/nginx/sites-enabled/ |
Infine, riavviare il servizio Nginx con il comando:
|
0 |
sudo systemctl restart nginx |
ACCESSO E CONFIGURAZIONE DA INTERFACCIA WEB DI OSTICKET
Richiamare il link inserito nel file creato dell’host virtuale
http://nome-server.dominio.com
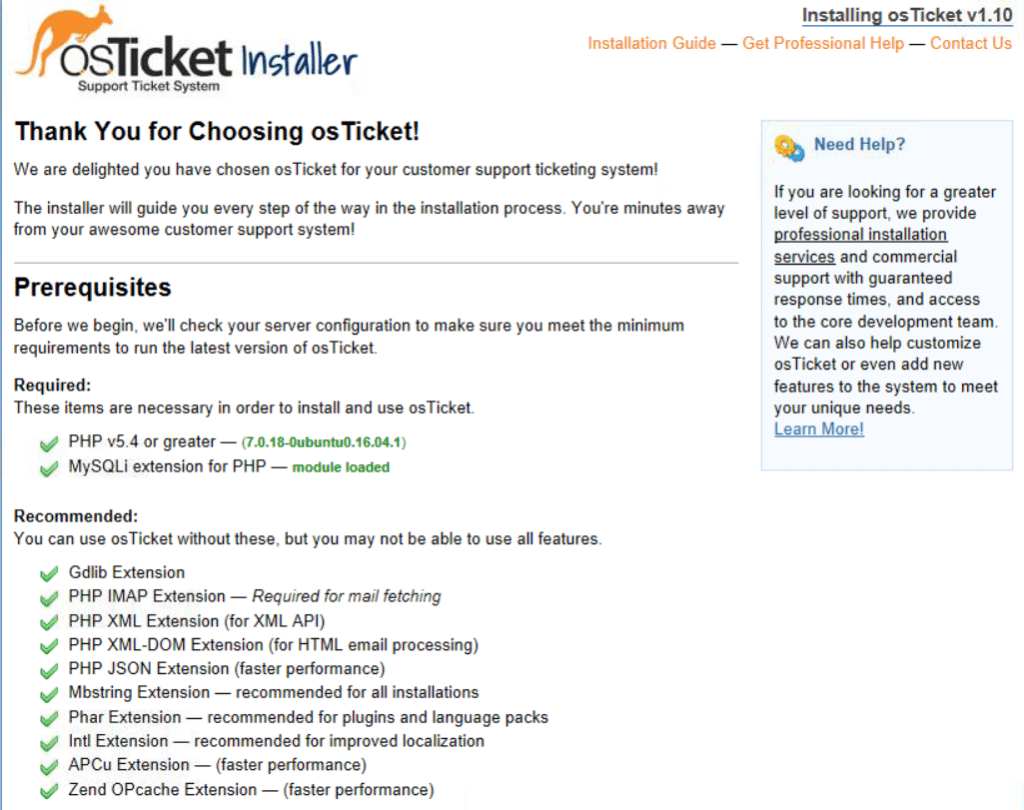
Se è tutto ok dovremmo vedere una schermata come quella sovrastante con tutti i prerequisiti rispettati
Clicchiamo su Continue per procedere con l’installazione
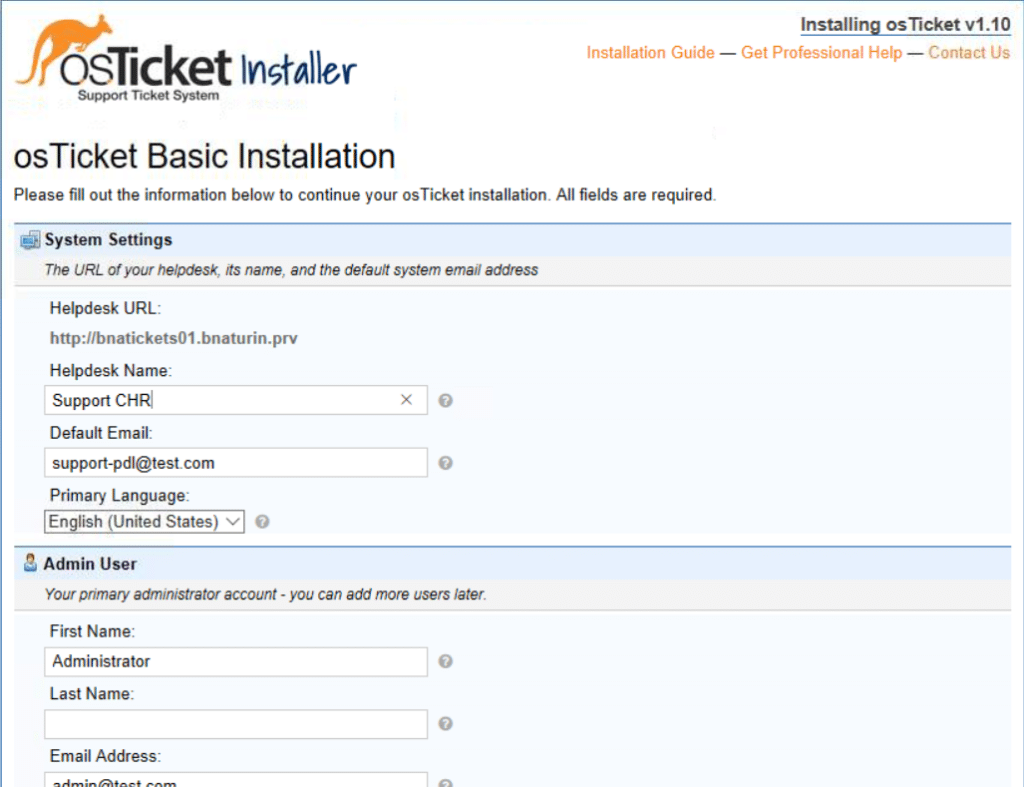
Compilare tutti i campi con le informazioni richieste
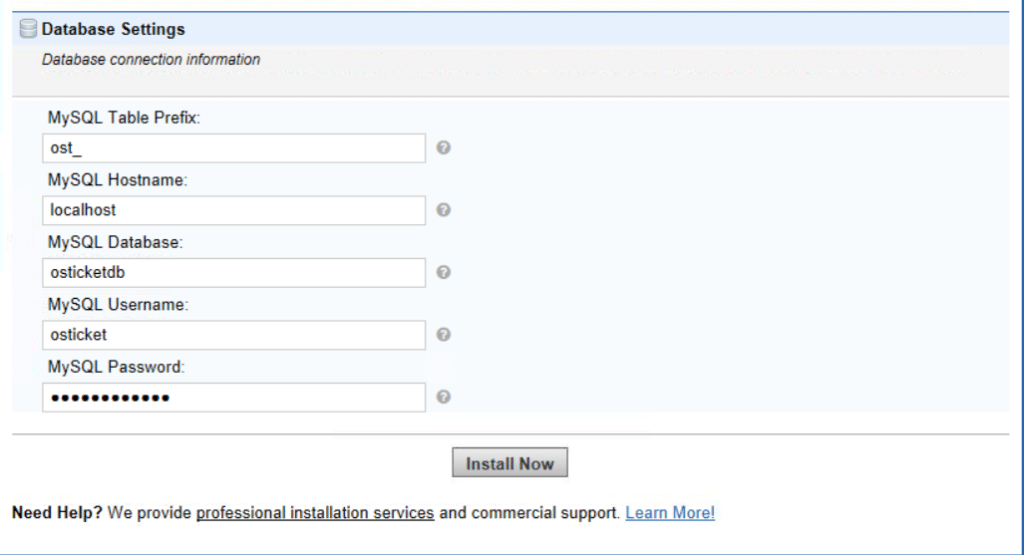
Inserire tutte le informazioni relative al database create in precedenza quindi cliccare su Install Now
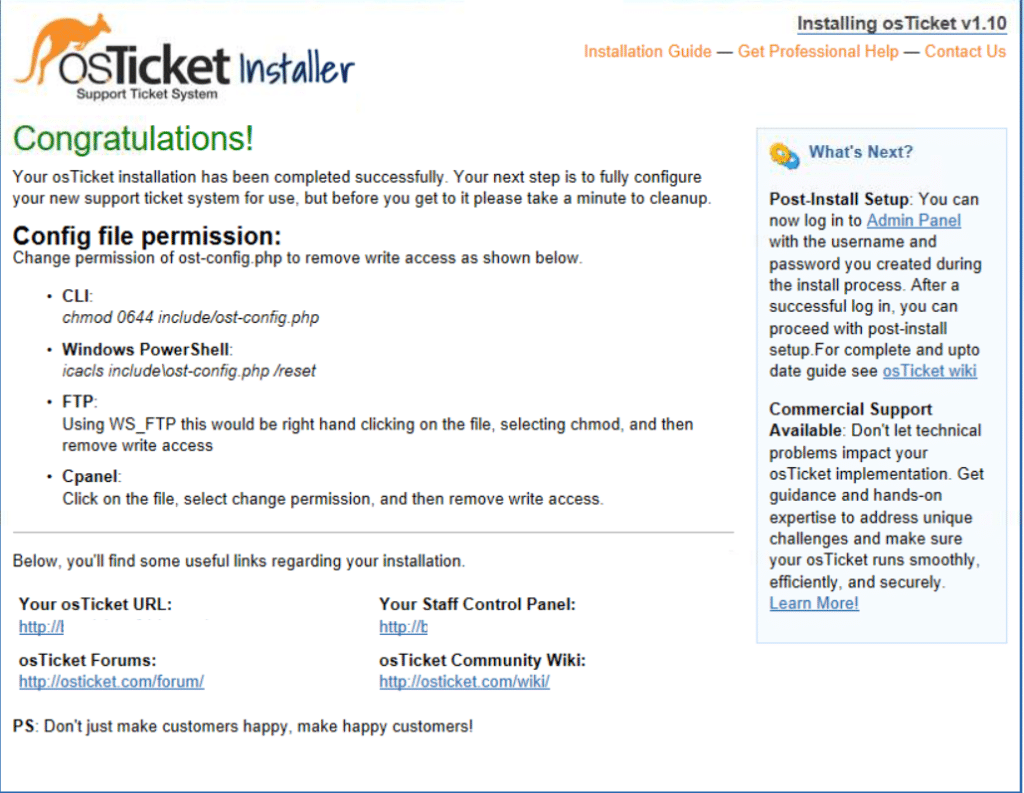
Se è andata tutto bene dovremmo vedere una schermata come quella sovrastante
Il link per il sito osTicket è : http://nome-server.dominio
Il link per il back-end amministrativo del sito è : http://nome-server.dominio/scp
Una volta completata l’installazione, rimuovere la directory di installazione e modificare l’autorizzazione del file di configurazione di osTicket:
|
0 1 2 |
sudo rm -rf /var/www/html/osticket/upload/setup sudo chmod 0644 /var/www/html/osticket/upload/include/ost-config.php |












![Errore in LibreNMS: Python3 module issue found: ‘Required packages: [‘PyMySQL!=1.0.0’, ‘python-dotenv’, ‘redis>=4.0’, ‘setuptools’, ‘psutil>=5.6.0’, ‘command_runner>=1.3.0’]](https://www.raffaelechiatto.com/wp-content/uploads/2024/09/Errore_in_LibreNMS_Python3_module_issue_found-1080x675.png)









0 commenti