Roxy-WI è stato creato per le persone che desiderano avere un’infrastruttura tollerante ai guasti, ma non vogliono immergersi nei dettagli della configurazione e della creazione di un cluster basato su HAProxy, NGINX, Apache e Keepalived.
In pratica una comoda interfaccia per gestire tutti i servizi in un unico posto.
In questo articolo vedremo come installarlo su Ubuntu Server 22.04
INSTALLAZIONE DELLE DIPENDENZE
Procedere all’installazione delle dipendenze con il comando:
|
0 |
sudo apt-get install apache2 python3 python3-pip python3-ldap rsync ansible python3-requests python3-networkx python3-matplotlib python3-bottle python3-future python3-jinja2 python3-peewee python3-distro python3-pymysql python3-psutil python3-paramiko netcat-traditional nmap net-tools lshw dos2unix libapache2-mod-wsgi-py3 openssl sshpass python3-flask python3-flask-login python3-flask-caching -y |
Clonare il Roxy-WI nella directory www con i seguenti comandi:
|
0 1 |
cd /var/www/ sudo git clone https://github.com/hap-wi/roxy-wi.git /var/www/haproxy-wi |
Se è tutto OK dovremmo vedere il seguente output:
|
0 1 2 3 4 5 6 |
Cloning into '/var/www/haproxy-wi'... remote: Enumerating objects: 13960, done. remote: Counting objects: 100% (1611/1611), done. remote: Compressing objects: 100% (622/622), done. remote: Total 13960 (delta 1035), reused 1384 (delta 978), pack-reused 12349 Receiving objects: 100% (13960/13960), 42.13 MiB | 13.73 MiB/s, done. Resolving deltas: 100% (10671/10671), done. |
INSTALLAZIONE DI ROXY-WI
Eseguire i comandi in sequenza:
|
0 1 2 3 4 5 6 7 8 9 10 11 12 13 14 15 16 17 18 |
sudo chown -R www-data:www-data haproxy-wi/ sudo cp haproxy-wi/config_other/httpd/roxy-wi_deb.conf /etc/apache2/sites-available/roxy-wi.conf sudo a2ensite roxy-wi.conf sudo a2enmod cgid ssl proxy_http rewrite sudo pip3 install -r haproxy-wi/config_other/requirements_deb.txt sudo systemctl restart apache2 sudo pip3 install paramiko-ng sudo chmod +x haproxy-wi/app/create_db.py sudo cp haproxy-wi/config_other/logrotate/* /etc/logrotate.d/ sudo mkdir /var/lib/roxy-wi/ sudo mkdir /var/lib/roxy-wi/keys/ sudo mkdir /var/lib/roxy-wi/configs/ sudo mkdir /var/lib/roxy-wi/configs/hap_config/ sudo mkdir /var/lib/roxy-wi/configs/kp_config/ sudo mkdir /var/lib/roxy-wi/configs/nginx_config/ sudo mkdir /var/lib/roxy-wi/configs/apache_config/ sudo mkdir /var/log/roxy-wi/ sudo mkdir /etc/roxy-wi/ sudo mv haproxy-wi/roxy-wi.cfg /etc/roxy-wi |
Quindi procedere alla creazione del certificato SSL con il comando:
|
0 |
sudo openssl req -newkey rsa:4096 -nodes -keyout /var/www/haproxy-wi/app/certs/haproxy-wi.key -x509 -days 10365 -out /var/www/haproxy-wi/app/certs/haproxy-wi.crt -subj "/C=IT/ST=Italy/L=Torino/O=Roxy-WI/OU=IT/CN=*.roxyserver.it/[email protected]" |
NOTA BENE: prima di eseguire il comando personalizzare i seguenti valori:
C=IT
ST=Italy
L=Torino
O=Roxy-WI
OU=IT
CN=*.roxyserver.it
[email protected]
Quindi procedere con i seguenti comandi:
|
0 1 2 3 4 5 6 |
sudo chown -R www-data:www-data /var/www/haproxy-wi/ sudo chown -R www-data:www-data /var/lib/roxy-wi/ sudo chown -R www-data:www-data /var/log/roxy-wi/ sudo chown -R www-data:www-data /etc/roxy-wi/ sudo systemctl daemon-reload sudo systemctl restart apache2 sudo systemctl restart rsyslog |
CREAZIONE DEL DATABASE
Per procedere con la creazione del database eseguire i comandi:
|
0 1 2 3 |
cd /var/www/haproxy-wi/app sudo ./create_db.py sudo chown -R www-data:www-data /var/www/haproxy-wi/ sudo chown -R www-data:www-data /var/lib/roxy-wi/ |
A questo punto è possibile richiamare Roxy-Wi tramite la GUI web digitando in un qualsiasi browser
https://IP_DEL_SERVER
Se è andato tutto a buon fine dovremmo vedere la schermata di login come nell’immagine sovrastante
Inserire le credenziali di default quindi premere Login:
USER: admin
PASSWORD: admin
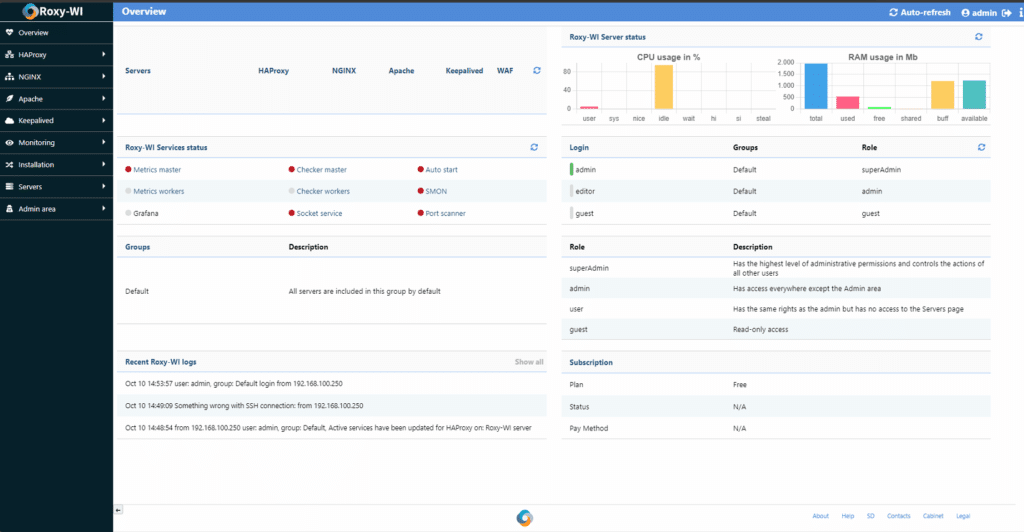
Se è tutto OK dovremmo vedere la Dashboard di Roxy-Wi come mostrato nell’immagine sovrastante.
INSTALLAZIONE E CONFIGURAZIONE DI MYSQL
Roxy-Wi utilizza come database di default SQLite. E’ possibile configurare Roxy-Wi su un database differente da quello di default e quindi utilizzando MySQL.
Per poter utilizzare MySQL come database seguire gli steps elencati di seguito.
|
0 1 |
sudo apt install mariadb-server sudo mysql_secure_installation |
Dovremmo visualizzare il seguente output:
|
0 1 2 3 4 5 6 7 8 9 10 11 12 13 14 15 16 17 18 19 20 21 22 23 24 25 26 27 28 29 30 31 32 33 34 35 36 37 38 39 40 41 42 43 44 45 46 47 48 49 50 51 52 53 54 55 56 57 58 59 60 61 62 63 64 65 |
NOTE: RUNNING ALL PARTS OF THIS SCRIPT IS RECOMMENDED FOR ALL MariaDB SERVERS IN PRODUCTION USE! PLEASE READ EACH STEP CAREFULLY! In order to log into MariaDB to secure it, we'll need the current password for the root user. If you've just installed MariaDB, and haven't set the root password yet, you should just press enter here. Enter current password for root (enter for none): OK, successfully used password, moving on... Setting the root password or using the unix_socket ensures that nobody can log into the MariaDB root user without the proper authorisation. You already have your root account protected, so you can safely answer 'n'. Switch to unix_socket authentication [Y/n] y Enabled successfully! Reloading privilege tables.. ... Success! You already have your root account protected, so you can safely answer 'n'. Change the root password? [Y/n] y New password: Re-enter new password: Password updated successfully! Reloading privilege tables.. ... Success! By default, a MariaDB installation has an anonymous user, allowing anyone to log into MariaDB without having to have a user account created for them. This is intended only for testing, and to make the installation go a bit smoother. You should remove them before moving into a production environment. Remove anonymous users? [Y/n] y ... Success! Normally, root should only be allowed to connect from 'localhost'. This ensures that someone cannot guess at the root password from the network. Disallow root login remotely? [Y/n] y ... Success! By default, MariaDB comes with a database named 'test' that anyone can access. This is also intended only for testing, and should be removed before moving into a production environment. Remove test database and access to it? [Y/n] y - Dropping test database... ... Success! - Removing privileges on test database... ... Success! Reloading the privilege tables will ensure that all changes made so far will take effect immediately. Reload privilege tables now? [Y/n] y ... Success! Cleaning up... All done! If you've completed all of the above steps, your MariaDB installation should now be secure. Thanks for using MariaDB! |
CREAZIONE DEL DATABASE E DELL’UTENTE
Accedere al MySQL con il comando:
|
0 |
sudo mysql -u root |
Quindi eseguire i comandi elencati di seguito per la creazione dell’utente e del database:
|
0 1 2 3 |
create user 'roxy-wi'@'%'; create database roxywi; grant all on roxywi.* to 'roxy-wi'@'%' IDENTIFIED BY 'PASSWORD'; grant all on roxywi.* to 'roxy-wi'@'localhost' IDENTIFIED BY 'PASSWORD'; |
ATTENZIONE: al posto di PASSWORD inserire la password da dare all’utente
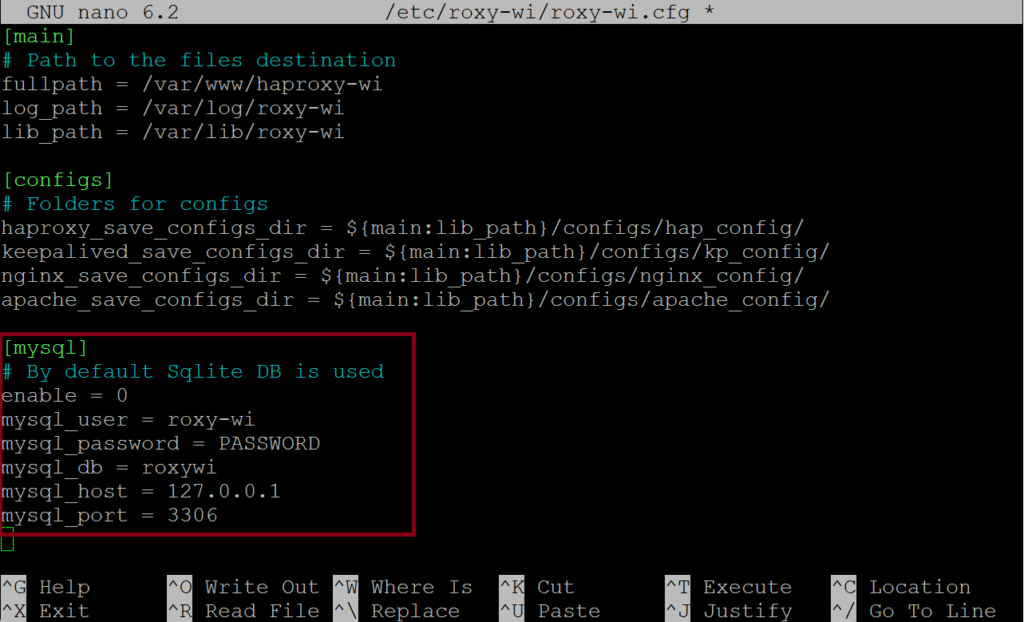
Dopo aver creato il database modificare il file di configurazione inserendo le informazioni corrette del nuovo database. Digitare il comando:
|
0 |
sudo nano /etc/roxy-wi/roxy-wi.cfg |
Inserire le seguenti informazioni come mostrato nell’immagine sovrastante:
|
0 1 2 3 4 5 6 7 |
[mysql] # By default Sqlite DB is used enable = 0 mysql_user = roxy-wi mysql_password = PASSWORD mysql_db = roxywi mysql_host = 127.0.0.1 mysql_port = 3306 |
ATTENZIONE: al posto di PASSWORD inserire la password configurata in precedenza
A questo punto riavviare il server per rendere effettive tutte le modifiche.
Richiamare la GUI Web e verificare che si apra senza nessun problema.


0 commenti