
Psono Password Manager, archivia e condividi le tue password in modo sicuro.
Psono è il gestore delle password. Viene utilizzato per creare, archiviare e condividere password in modo sicuro con altri su più dispositivi. Non utilizzare mai più una password due volte.
PRE-REQUISITI
Sistema operativo Ubuntu 18.04 a 64 bit
Un account utente con privilegi sudo
Riga di comando / terminale (CTRL-ALT-T o menu Applicazioni> Accessori> Terminale)
INSTALLAZIONE DI POSTGRES DB
Prima di tutto installiamo i seguenti pacchetti con il comando
|
0 |
sudo apt-get install postgresql postgresql-contrib |
Procediamo con la modifica dell’utente Postgres con il comando
|
0 |
sudo su - postgress |
Creare un nuovo database con il comando
|
0 |
createdb psono |
Cambiare quindi il prompt dei comandi utilizzando l’utente postgres
|
0 |
psql psono |
Eseguire i comandi riportati di seguito per creare l’utente e concedere tutti i privilegi al database
|
0 1 |
CREATE USER psono WITH PASSWORD 'password'; GRANT ALL PRIVILEGES ON DATABASE "psono" to psono; |
ATTENZIONE: sosituire il campo password con una password a nostro piacimento
Installare quindi delle estensioni necessarie con i comandi
|
0 1 |
CREATE EXTENSION IF NOT EXISTS ltree; CREATE EXTENSION IF NOT EXISTS "pgcrypto"; |
Per uscire dalla configurazione del database eseguire i comandi
|
0 |
\q |
Quindi per ritornare all’utente precedente digitare il comando
|
0 |
Ctrl + D |
Riavviare il Postgres con il comando
|
0 |
sudo service postgresql restart |
Verificare che il database sia attivo con il comando
|
0 |
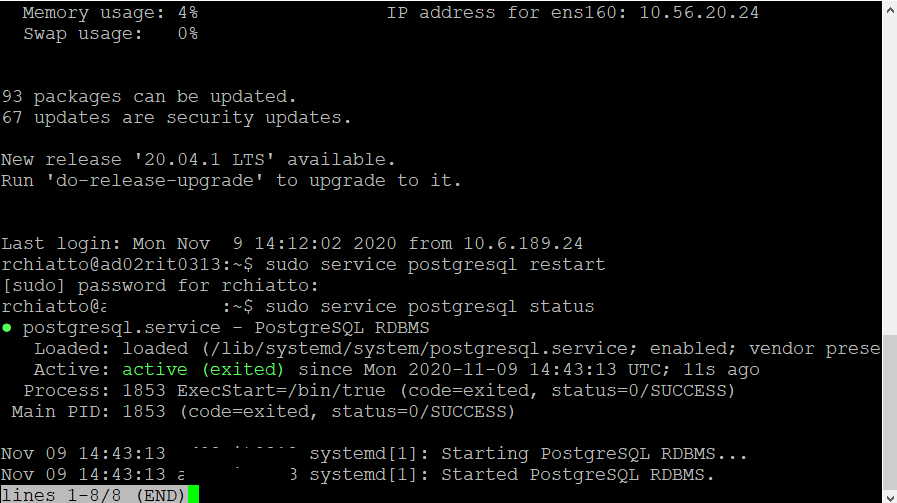
sudo service postgresql status |
Se è tutto OK dovremmo vedere una schermata come quella sovrastante
INSTALLAZIONE DI PSONO SERVER COMMUNITY EDITION
In questa guida installeremo il server Psono e verrà eseguito con gunicorn e nginx.
Diventare root con il comando
|
0 |
sudo su |
Installare i seguenti pacchetti con i comandi
|
0 |
sudo apt-get update |
quindi
|
0 1 2 3 4 5 6 7 8 9 10 11 12 13 14 15 |
apt-get install -y \ git \ libyaml-dev \ libpython3-dev \ libpq-dev \ libffi-dev \ python3-dev \ python-pip \ python3-pip \ python3-psycopg2 \ postgresql-client \ haveged \ libsasl2-dev \ libldap2-dev \ libssl-dev \ supervisor |
quindi installiamo GUnicorn con il comando
|
0 |
pip3 install gunicorn |
Creare un account psono con il comando
|
0 |
adduser psono |
Quindi inserire la password desiderata quando richiesto e inserire tutte le info richieste successivamente
Modificare l’utente con il comando
|
0 |
su psono |
Clonare la GIT Repository con il comando
|
0 |
git clone https://gitlab.com/psono/psono-server.git ~/psono-server |
Installare i pacchetti essenziali per il Python con i seguenti comandi
Ritornare all’utente di root con il comando
|
0 |
CTRL + D |
Posizionarsi nella cartella psono-server con il comando
|
0 |
cd /home/psono/psono-server |
Installare i requisiti con il comando
|
0 |
pip3 install -r requirements.txt |
Ritornare all’utente psono con il comando
|
0 |
su psono |
Creare la cartella dei settaggi con il comando
|
0 |
mkdir ~/.psono_server |
Creare un file settings.yaml in ~/.psono_server/ con il comando
|
0 |
nano ~/.psono_server/settings.yaml |
Incollare il seguente contenuto
|
0 1 2 3 4 5 6 7 8 9 10 11 12 13 14 15 16 17 18 19 20 21 22 23 24 25 26 27 28 29 30 31 32 33 34 35 36 37 38 39 40 41 42 43 44 45 46 47 48 49 50 51 52 53 54 55 56 57 58 59 60 61 62 63 64 65 66 67 68 69 70 71 72 73 74 75 76 77 78 79 80 81 82 83 84 85 86 87 88 89 90 91 92 93 94 95 96 97 98 99 100 101 102 103 104 105 106 107 108 109 110 111 112 113 114 115 116 117 118 119 120 121 122 123 124 125 126 127 128 129 130 131 132 133 134 135 136 137 138 139 140 141 142 143 144 145 146 147 148 149 150 151 152 153 |
# generate the following six parameters with the following command # python3 ~/psono-server/psono/manage.py generateserverkeys SECRET_KEY: 'zgFqxW3hkWBXoMKhPOug77AB2qaMxegwh15mwo28THgxMxgQQUjCR' ACTIVATION_LINK_SECRET: 'gxGBTCOuCLhdWx3tRNhqBJo8BiBa9QiKI8npzIeR2ylLxHtf' DB_SECRET: 'wHPhrlAFKoBOUbSsdXsTvArsKHOgNDk6vsSLGzcMvDU3L1xY4r6qgZC3vco' EMAIL_SECRET_SALT: '$adkgnEndSBVNqMRFH.O' PRIVATE_KEY: 'a1ee57e26ffa587e93604c913a1ec99e5b8c3d363e21e2eda' PUBLIC_KEY: 'ca0fa92bba376a1d64c0e06c502ea61995cc0e77645e855' # The URL of the web client (path to e.g activate.html without the trailing slash) # WEB_CLIENT_URL: 'https://www.psono.pw' # Switch DEBUG to false if you go into production DEBUG: False # Adjust this according to Django Documentation https://docs.djangoproject.com/en/2.2/ref/settings/ ALLOWED_HOSTS: ['*'] # Should be your domain without "www.". Will be the last part of the username ALLOWED_DOMAINS: ['psono.pw'] # If you want to disable registration, you can comment in the following line # ALLOW_REGISTRATION: False # If you want to disable the lost password functionality, you can comment in the following line # ALLOW_LOST_PASSWORD: False # If you want to enforce that the email address and username needs to match upon registration # ENFORCE_MATCHING_USERNAME_AND_EMAIL: False # If you want to restrict registration to some email addresses you can specify here a list of domains to filter # REGISTRATION_EMAIL_FILTER: ['company1.com', 'company2.com'] # Should be the URL of the host under which the host is reachable # If you open the url and append /info/ to it you should have a text similar to {"info":"{\"version\": \"....} HOST_URL: 'https://www.psono.pw/server' # The email used to send emails, e.g. for activation # ATTENTION: If executed in a docker container, then "localhost" will resolve to the docker container, so # "localhost" will not work as host. Use the public IP or DNS record of the server. EMAIL_HOST: 'localhost' EMAIL_HOST_USER: '' EMAIL_HOST_PASSWORD : '' EMAIL_PORT: 25 EMAIL_SUBJECT_PREFIX: '' EMAIL_USE_TLS: False EMAIL_USE_SSL: False EMAIL_SSL_CERTFILE: EMAIL_SSL_KEYFILE: EMAIL_TIMEOUT: # In case one wants to use mailgun, comment in below lines and provide the mailgun access key and server name # EMAIL_BACKEND: 'anymail.backends.mailgun.EmailBackend' # MAILGUN_ACCESS_KEY: '' # MAILGUN_SERVER_NAME: '' # In case you want to offer Yubikey support, create a pair of credentials here https://upgrade.yubico.com/getapikey/ # and update the following two lines before commenting them in # YUBIKEY_CLIENT_ID: '123456' # YUBIKEY_SECRET_KEY: '8I65IA6ASDFIUHGIH5021FKJA=' # If you have own Yubico servers, you can specify here the urls as a list # YUBICO_API_URLS: ['https://api.yubico.com/wsapi/2.0/verify'] # Cache enabled without belows Redis may lead to unexpected behaviour # Cache with Redis # By default you should use something different than database 0 or 1, e.g. 13 (default max is 16, can be configured in # redis.conf) possible URLS are: # redis://[:password]@localhost:6379/0 # rediss://[:password]@localhost:6379/0 # unix://[:password]@/path/to/socket.sock?db=0 # CACHE_ENABLE: False # CACHE_REDIS: False # CACHE_REDIS_LOCATION: 'redis://127.0.0.1:6379/13' # Disables Throttling (necessary for unittests to pass) by overriding the cache with a dummy cache # https://docs.djangoproject.com/en/2.2/topics/cache/#dummy-caching-for-development # THROTTLING: False # Enables the management API, required for the psono-admin-client / admin portal # MANAGEMENT_ENABLED: False # Enables the fileserver API, required for the psono-fileserver # FILESERVER_HANDLER_ENABLED: False # Enables files for the client # FILES_ENABLED: False # Allows that users can search for partial usernames # ALLOW_USER_SEARCH_BY_USERNAME_PARTIAL: True # Allows that users can search for email addresses too # ALLOW_USER_SEARCH_BY_EMAIL: True # Disables central security reports # DISABLE_CENTRAL_SECURITY_REPORTS: True # Configures a system wide DUO connection for all clients # DUO_INTEGRATION_KEY: '' # DUO_SECRET_KEY: '' # DUO_API_HOSTNAME: '' # If you are using the DUO proxy, you can configure here the necessary HTTP proxy # DUO_PROXY_HOST: 'the-ip-or-dns-name-goes-here' # DUO_PROXY_PORT: 80 # DUO_PROXY_TYPE: 'CONNECT' # If your proxy requires specific headers you can also configure these here # DUO_PROXY_HEADERS: '' # Normally only one of the configured second factors needs to be solved. Setting this to True forces the client to solve all # MULTIFACTOR_ENABLED: True # Allows admins to limit the offered second factors in the client # ALLOWED_SECOND_FACTORS: ['yubikey_otp', 'google_authenticator', 'duo'] # Your Postgres Database credentials # ATTENTION: If executed in a docker container, then "localhost" will resolve to the docker container, so # "localhost" will not work as host. Use the public IP or DNS record of the server. DATABASES: default: 'ENGINE': 'django.db.backends.postgresql_psycopg2' 'NAME': 'psono' 'USER': 'psono' 'PASSWORD': 'password' 'HOST': 'localhost' 'PORT': '5432' # for master / slave replication setup comment in the following (all reads will be redirected to the slave # slave: # 'ENGINE': 'django.db.backends.postgresql_psycopg2' # 'NAME': 'YourPostgresDatabase' # 'USER': 'YourPostgresUser' # 'PASSWORD': 'YourPostgresPassword' # 'HOST': 'YourPostgresHost' # 'PORT': 'YourPostgresPort' # Update the path to your templates folder # If you do not want to change it (yet) you can leave it like it is. TEMPLATES: [ { 'BACKEND': 'django.template.backends.django.DjangoTemplates', 'DIRS': ['/home/psono/psono-server/psono/templates'], 'APP_DIRS': True, 'OPTIONS': { 'context_processors': [ 'django.template.context_processors.debug', 'django.template.context_processors.request', 'django.contrib.auth.context_processors.auth', 'django.contrib.messages.context_processors.messages', ], }, }, ] |
ATTENZIONE: Dopo aver incollato le righe di codice nel file di configurazione modificarer i seguenti blocchi:
PER L’INVIO DELLE MAIL
|
0 1 2 3 4 5 6 7 8 9 10 |
EMAIL_HOST: 'localhost' EMAIL_HOST_USER: '' EMAIL_HOST_PASSWORD : '' EMAIL_PORT: 25 EMAIL_SUBJECT_PREFIX: '' EMAIL_USE_TLS: False EMAIL_USE_SSL: False EMAIL_SSL_CERTFILE: EMAIL_SSL_KEYFILE: EMAIL_TIMEOUT: |
LA CONFIGURAZIONE DEL DATABASE FATTA IN PRECEDENZA
|
0 1 2 3 4 5 6 7 |
DATABASES: default: 'ENGINE': 'django.db.backends.postgresql_psycopg2' 'NAME': 'psono' 'USER': 'psono' 'PASSWORD': 'password' 'HOST': 'localhost' 'PORT': '5432' |
CREARE LE CHIAVI DI SCUREZZA
Per generare questa chiavi eseguire il comando
|
0 |
python3 ~/psono-server/psono/manage.py generateserverkeys |
Se andato tutto bene dovremmo vedere le seguenti righe
|
0 1 2 3 4 5 6 7 8 9 10 11 |
# Copy paste this content into your settings.yml and replace existing occurrences # # WARNING: Do this only for a fresh installation! # Changing those variables afterwards will break the program e.g.: # Activation links will not work, Server will not be able to read user emails, ... SECRET_KEY: 'zgFqxW3hkWBXoMKhPOug77AB2qaMxegwh15mwo28THgxMxgQQUjCR' ACTIVATION_LINK_SECRET: 'gxGBTCOuCLhdWx3tRNhqBJo8BiBa9QiKI8npzIeR2ylLxHtf' DB_SECRET: 'wHPhrlAFKoBOUbSsdXsTvArsKHOgNDk6vsSLGzcMvDU3L1xY4r6qgZC3vco' EMAIL_SECRET_SALT: '$adkgnEndSBVNqMRFH.O' PRIVATE_KEY: 'a1ee57e26ffa587e93604c913a1ec99e5b8c3d363e21e2eda' PUBLIC_KEY: 'ca0fa92bba376a1d64c0e06c502ea61995cc0e77645e855' |
Copiare e incollare le sei righe all’interno del file settings.yaml
TEST DI FUNZIONAMENTO
Come prima cosa testiamo che la configurazione della posta elettronica sia a posto eseguendo il comando
|
0 |
python3 ~/psono-server/psono/manage.py sendtestmail mail@mail.com |
ATTENZIONE: inserire al posto di [email protected] l’indirizzo email dove vogliamo ricevere la mail di testiamo
Se riceviamo la mail vuol dire che la configurazione è OK.
CREAZIONE DEL DATABASE
Creare il database con il comando
|
0 |
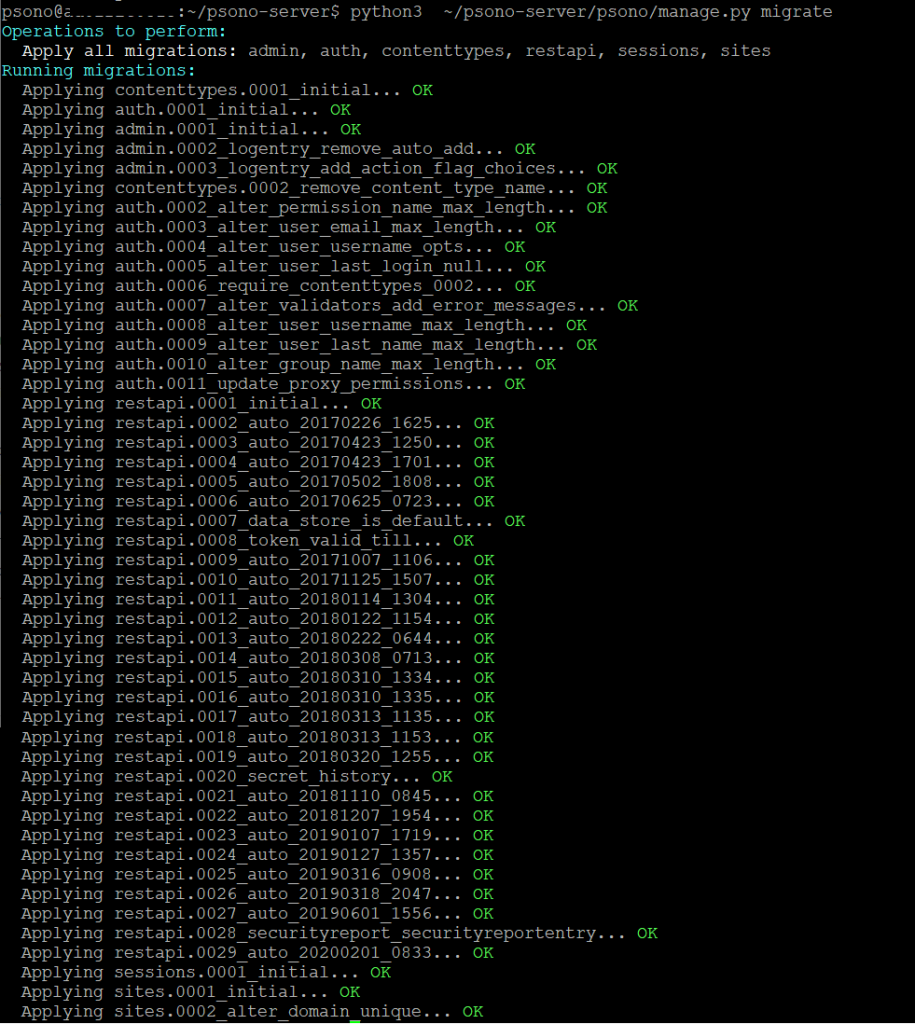
python3 ~/psono-server/psono/manage.py migrate |
Se è andato a tutto buon fine dovremmo vedere una schermata come quella sovrastante
AVVIO DEL SERVER PSONO
Eseguire il comando
|
0 |
cd ~/psono-server/psono |
Quindi avviare il server con il comando
|
0 |
gunicorn --bind 0.0.0.0:10100 wsgi |
Se è tutto corretto dovremmo vedere una schermata come quella sovrastante
Ritornare all’utente root con il comando
|
0 |
CTRL + D |
Creare un psono-server.conf in /etc/supervisor/conf.d/ con il comando:
|
0 |
nano /etc/supervisor/conf.d/psono-server.conf |
All’interno del file copiare le seguenti righe di codice
|
0 1 2 3 4 5 6 |
[program:psono-server] command = /usr/local/bin/gunicorn --bind 127.0.0.1:10100 wsgi directory=/home/psono/psono-server/psono user = psono autostart=true autorestart=true redirect_stderr=true |
ATTENZIONE: In questo modo Psono è accessibile solo da localhost, il che va bene dato che invieremo richieste di reverse-proxy con nginx.
Salvare e chiudere il file di configurazione
Riavviare il supervisorctl con il comando
|
0 |
supervisorctl reload |
Ora è possibile controllare il server PSONO con i seguenti comandi
|
0 1 2 |
supervisorctl status psono-server supervisorctl start psono-server supervisorctl stop psono-server |
CONFIGURAZIONE PROCESSO DI PULIZIA
Eseguire il comando
|
0 |
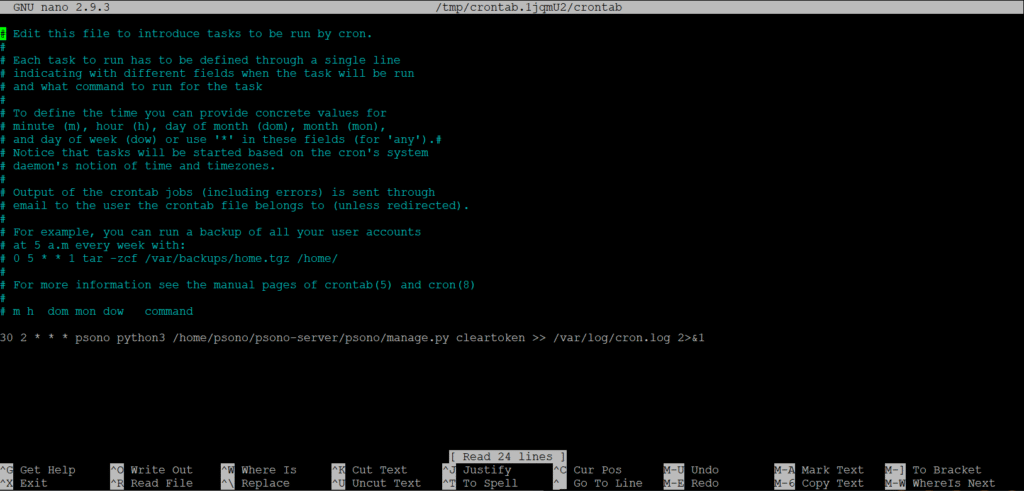
crontab -e |
e aggiungere al fondo la seguente riga
|
0 |
30 2 * * * psono python3 /home/psono/psono-server/psono/manage.py cleartoken >> /var/log/cron.log 2>&1 |
Dovremmo vedere una schermata come quella sovrastante
INSTALLAZIONE E CONFIGURAZIONE REVERSE PROXY
Psono di solito richiede un reverse proxy per funzionare correttamante.
PRE-REQUISITI
https://psono.example.com per ospitare il tuo client web
https://psono.example.com/server ospiterà il tuo server
https://psono.example.com/portal ospiterà il tuo portale di amministrazione
Avere un certificato valido in /etc/ssl/ con fullchain.pem e privkey.pem
Esiste un record A per psono.example.com, che punta all’indirizzo IP del tuo server
Il server psono viene eseguito sulla porta 10100
Il webclient viene eseguito sulla porta 10101 o è stato decompresso in /var/www/html
Il client web di amministrazione viene eseguito sulla porta 10102 o è stato decompresso in /var/www/html/portal
INSTALLAZIONE CERTIFICATO SSL
TLS / SSL funziona utilizzando una combinazione di un certificato pubblico e una chiave privata.
La chiave SSL è tenuta segreta sul server.
Viene utilizzato per crittografare il contenuto inviato ai client.
Il certificato SSL viene condiviso pubblicamente con chiunque ne richieda il contenuto.
Può essere utilizzato per decrittografare il contenuto firmato dalla chiave SSL associata.
Eseguire il comando
|
0 |
sudo apt update && sudo apt upgrade |
Installare il pacchetto certbot con il comando
|
0 |
sudo apt install certbot |
Ora possiamo eseguire Certbot per ottenere il nostro certificato.
Useremo l’opzione –standalone per dire a Certbot di gestire la sfida utilizzando il proprio server web integrato.
L’opzione –preferred-challenge indica a Certbot di utilizzare la porta 80 o la porta 443.
Se stai utilizzando la porta 80, ti consigliamo –preferred-challenge http. Per la porta 443 sarebbe –preferred-challenge tls-sni.
Infine, il flag -d viene utilizzato per specificare il dominio per il quale stai richiedendo un certificato.
È possibile aggiungere più opzioni -d per coprire più domini in un certificato.
Eseguire il comando
|
0 |
sudo certbot certonly --standalone --preferred-challenges http -d dominio.com |
A questo punto reperire i file fullchain.pem e privkey.pem e copiarli nella cartella /etc/ssl
INSTALLAZIONE NGINX
Procediamo con l’installazione di Nginx con il comando
|
0 |
sudo apt-get install nginx |
Creare il file di configurazione di Nginx con il comando
|
0 |
sudo nano /etc/nginx/sites-available/psono.example.com.conf |
Aggiungere all’interno del file le seguenti righe di codice
|
0 1 2 3 4 5 6 7 8 9 10 11 12 13 14 15 16 17 18 19 20 21 22 23 24 25 26 27 28 29 30 31 32 33 34 35 36 37 38 39 40 41 42 43 44 45 46 47 48 49 50 51 52 53 54 55 56 57 58 59 60 61 62 63 64 65 66 67 68 69 70 71 72 73 74 75 76 77 78 79 80 81 82 83 84 85 86 87 88 89 90 91 92 93 94 95 96 97 98 99 100 101 102 103 104 105 106 107 108 109 110 111 112 113 114 115 116 117 118 119 120 121 122 123 124 125 126 127 |
server { listen 80; server_name psono.example.com; return 301 https://$host$request_uri; } server { listen 443 ssl http2; server_name server_psono.dominio.com; ssl_protocols TLSv1.2; ssl_prefer_server_ciphers on; ssl_session_cache shared:SSL:10m; ssl_session_tickets off; ssl_stapling on; ssl_stapling_verify on; ssl_session_timeout 1d; resolver 8.8.8.8 8.8.4.4 valid=300s; resolver_timeout 5s; ssl_ciphers 'ECDHE-ECDSA-AES256-GCM-SHA384:ECDHE-RSA-AES256-GCM-SHA384:ECDHE-ECDSA-CHACHA20-POLY1305:ECDHE-RSA-CHACHA20-POLY1305:ECDHE-ECDSA-AES128-GCM-SHA256:ECDHE-RSA-AES128-GCM-SHA256:ECDHE-ECDSA-AES256-SHA384:ECDHE-RSA-AES256-SHA384:ECDHE-ECDSA-AES128-SHA256:ECDHE-RSA-AES128-SHA256'; # Comment this in if you know what you are doing # add_header Strict-Transport-Security "max-age=63072000; includeSubdomains; preload"; add_header Referrer-Policy same-origin; add_header X-Frame-Options DENY; add_header X-Content-Type-Options nosniff; add_header X-XSS-Protection "1; mode=block"; # If you have the admin fileserver installed too behind this reverse proxy domain, add your fileserver URL e.g. https://fs01.example.com as connect-src too: add_header Content-Security-Policy "default-src 'none'; manifest-src 'self'; connect-src 'self' https://static.psono.com https://api.pwnedpasswords.com https://storage.googleapis.com https://*.digitaloceanspaces.com https://*.s3.amazonaws.com; font-src 'self'; img-src 'self' data:; script-src 'self'; style-src 'self' 'unsafe-inline'; object-src 'self'"; ssl_certificate /etc/ssl/fullchain.pem; ssl_certificate_key /etc/ssl/privkey.pem; client_max_body_size 256m; gzip on; gzip_disable "msie6"; gzip_vary on; gzip_proxied any; gzip_comp_level 6; gzip_buffers 16 8k; gzip_http_version 1.1; gzip_min_length 256; gzip_types text/plain text/css application/json application/x-javascript application/javascript text/xml application/xml application/xml+rss text/javascript application/vnd.ms-fontobject application/x-font-ttf font/opentype image/svg+xml image/x-icon; root /var/www/html; location /server { rewrite ^/server/(.*) /$1 break; proxy_set_header Host $host; proxy_set_header X-Real-IP $remote_addr; proxy_set_header X-Forwarded-For $proxy_add_x_forwarded_for; proxy_set_header X-Forwarded-Proto $scheme; add_header Last-Modified $date_gmt; add_header Pragma "no-cache"; add_header Cache-Control "private, max-age=0, no-cache, no-store"; if_modified_since off; expires off; etag off; proxy_pass http://localhost:10100; } location ~* ^/portal.*\.(?:ico|css|js|gif|jpe?g|png|eot|woff|woff2|ttf|svg|otf)$ { expires 30d; add_header Pragma public; add_header Cache-Control "public"; # Comment in the following lines if you have the admin webclient running in a docker container # proxy_set_header Host $host; # proxy_set_header X-Real-IP $remote_addr; # proxy_set_header X-Forwarded-For $proxy_add_x_forwarded_for; # proxy_set_header X-Forwarded-Proto $scheme; # # proxy_pass http://localhost:10102; # proxy_redirect http://localhost:10102 https://psono.example.com; } location ~* \.(?:ico|css|js|gif|jpe?g|png|eot|woff|woff2|ttf|svg|otf)$ { expires 30d; add_header Pragma public; add_header Cache-Control "public"; # Comment in the following lines if you have the webclient running in a docker container # proxy_set_header Host $host; # proxy_set_header X-Real-IP $remote_addr; # proxy_set_header X-Forwarded-For $proxy_add_x_forwarded_for; # proxy_set_header X-Forwarded-Proto $scheme; # # proxy_pass http://localhost:10101; # proxy_redirect http://localhost:10101 https://psono.example.com; } # Comment in the following lines if you have the admin webclient running in a docker container # location /portal { # proxy_set_header Host $host; # proxy_set_header X-Real-IP $remote_addr; # proxy_set_header X-Forwarded-For $proxy_add_x_forwarded_for; # proxy_set_header X-Forwarded-Proto $scheme; # # proxy_read_timeout 90; # # proxy_pass http://localhost:10102; # } # Comment in the following lines if you have the admin webclient NOT running in a docker container # location /portal { # index index.html index.htm; # try_files $uri /portal/index.html; # forward all requests to index.html # } # Comment in the following lines if you have the webclient running in a docker container # location / { # proxy_set_header Host $host; # proxy_set_header X-Real-IP $remote_addr; # proxy_set_header X-Forwarded-For $proxy_add_x_forwarded_for; # proxy_set_header X-Forwarded-Proto $scheme; # # proxy_pass http://localhost:10101; # proxy_read_timeout 90; # # proxy_redirect http://localhost:10101 https://psono.example.com; # } } |
ATTENZIONE: al posto di server_psono.dominio.com inserire il nome FQDN del server PSONO
Abilitare la configurazione Nginx con il comando
|
0 |
ln -s /etc/nginx/sites-available/psono.example.com.conf /etc/nginx/sites-enabled/ |
Testare quindi la configurazione Nginx con il comando
|
0 |
sudo nginx -t |
Riavviare Nginx con il comando
|
0 |
sudo service nginx restart |
Ora dovresti essere in grado di aprire https://psono.example.com nel tuo browser e vedere il client web Psono.




![Errore in LibreNMS: Python3 module issue found: ‘Required packages: [‘PyMySQL!=1.0.0’, ‘python-dotenv’, ‘redis>=4.0’, ‘setuptools’, ‘psutil>=5.6.0’, ‘command_runner>=1.3.0’]](https://www.raffaelechiatto.com/wp-content/uploads/2024/09/Errore_in_LibreNMS_Python3_module_issue_found-1080x675.png)





i got a problem after setting..settings.yaml
i wanna python3 ~/psono-server/psono/manage.py generateserverkeys after klik enter
i got an error like this
ERROR: Could not detect HOME, you can specify it with PSONO_HOME and check that it contains .psono_server/settings.yaml
cant u help me
Un Solo server che fa tutto…
Puoi chiarire l’architettura del sistema in cui hai installato psono? Non capisco se sono due server o solo uno – grazie.