DESCRIZIONE
rConfig è un software completamente open source, ovvero è possibile personalizzarlo e aggiungere funzionalità a proprio piacimento.
Scatta istantanee delle tabelle di routing, mac, tabelle arp, oltre a eseguire il backup delle configurazione dei network devices in modo automatico.
PRE-REQUISITI
Minimum Requirements
Centos 7+
PHP 7+
MySQL 5.6+
Apache 2.4+
Browser IE7+, Firefox3.5+, Chrome11+, Safari3+, Opera 9.4+
Per l’installazione del LAMP su CentOS seguire il tutorial indicato di seguito
Installazione di LAMP (Linux, Apache, MySQL, PHP) in CentOS 7
DOWNLOAD E PRE INSTALLAZIONE DI RCONFIG
Accedere al server in SSH con i diritti di root e lanciare i seguenti comandi in sequenza:
|
0 1 2 3 |
cd /home curl -O http://files.rconfig.com/downloads/scripts/install_rConfig.sh -A "Mozilla" chmod +x install_rConfig.sh ./install_rConfig.sh |
NOTA BENE: A seconda della velocità della connessione internet l’installazione potrebbe impiegare diversi minuti.
Ci verranno poste in fase di installazione le seguenti domande:
|
0 |
Do you want to allow Root access to FTP... (y/n)? |
Scrivere Y quindi INVIO
|
0 |
Do you want to enter your own NTP Server (default is time.nist.gov)? (y/n)? |
Scrivere Y se si vuole inserire un proprio NTP Server altrimenti N per confermare la configurazione di default
|
0 |
Please enter NTP Server Name or IP:ntp.raffaele.com |
Inserire il nome DNS o l’indirizzo IP del server NTP quindi INVIO
|
0 1 2 3 4 5 6 7 8 9 10 11 12 13 |
rConfig system installation is almost complete... Your final task will be to setup MySQL. Once the MySQL Setup wizard is complete, Please reboot your server and then run the post installation script /home/centos7_postReboot.sh The MySQL setup wizard will now launch .............................................. NOTE: RUNNING ALL PARTS OF THIS SCRIPT IS RECOMMENDED FOR ALL MySQL SERVERS IN PRODUCTION USE! PLEASE READ EACH STEP CAREFULLY! In order to log into MySQL to secure it, we'll need the current password for the root user. If you've just installed MySQL, and you haven't set the root password yet, the password will be blank, so you should just press enter here. Enter current password for root (enter for none): |
Inserire la password password dell’utente di root del MySQL e premere INVIO
|
0 1 2 3 |
Setting the root password ensures that nobody can log into the MySQL root user without the proper authorisation. You already have a root password set, so you can safely answer 'n'. Change the root password? [Y/n] |
Scrivere N e premere INVIO per non modificare la password
|
0 1 2 3 4 5 |
By default, a MySQL installation has an anonymous user, allowing anyone to log into MySQL without having to have a user account created for them. This is intended only for testing, and to make the installation go a bit smoother. You should remove them before moving into a production environment. Remove anonymous users? [Y/n] |
Scrivere Y e premere INVIO per rimuovere gli utenti anonimi
|
0 1 2 |
Normally, root should only be allowed to connect from 'localhost'. This ensures that someone cannot guess at the root password from the network. Disallow root login remotely? [Y/n] |
Scrivere N e premere INVIO per permettere all’utente di root il login remoto
|
0 1 2 3 |
By default, MySQL comes with a database named 'test' that anyone can access. This is also intended only for testing, and should be removed before moving into a production environment. Remove test database and access to it? [Y/n] |
Scrivere Y e premere INVIO per rimuovere i database di test
|
0 1 2 |
Reloading the privilege tables will ensure that all changes made so far will take effect immediately. Reload privilege tables now? [Y/n] |
Scrivere Y e premere INVIO per fare un flush dei privilegi
Se è tutto OK dovremmo vedere il seguente messaggio:
|
0 1 2 3 4 5 |
All done! If you've completed all of the above steps, your MySQL installation should now be secure. Thanks for using MySQL! Cleaning up... <<<< End - Checking CentOS version... >> |
A questo punto riavviamo il server
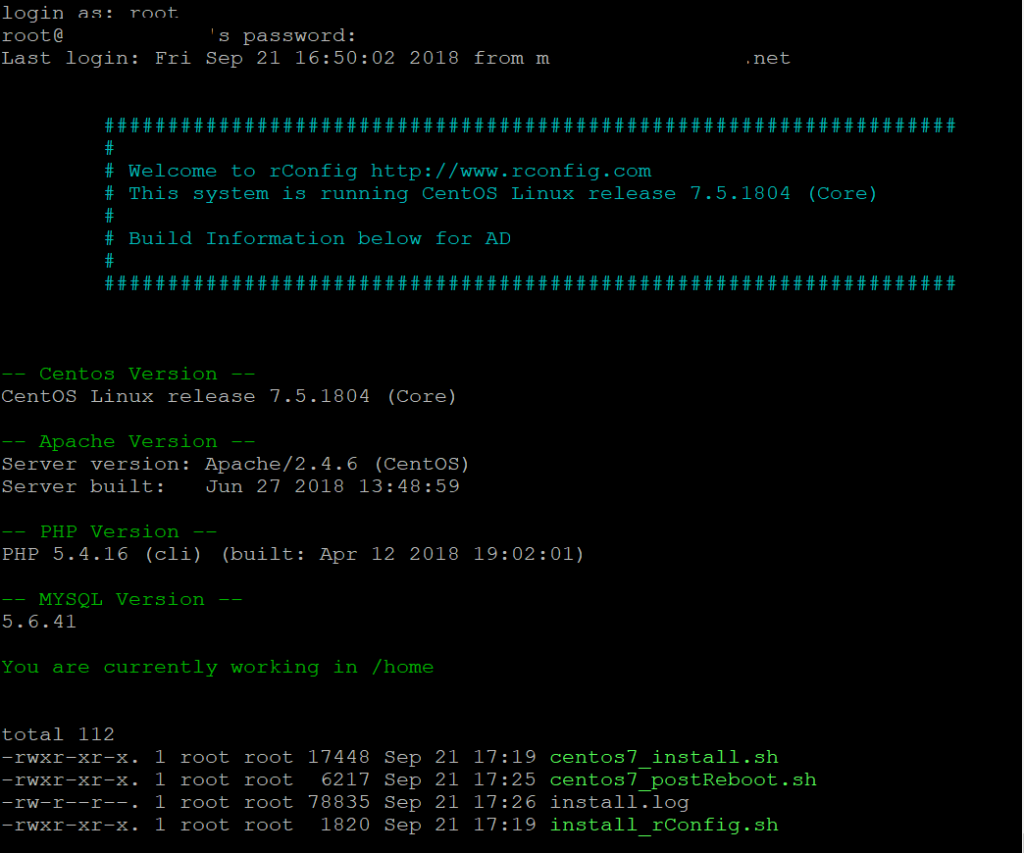
Dopo esserci loggati dovremmo vedere una schermata come quella sovrastante
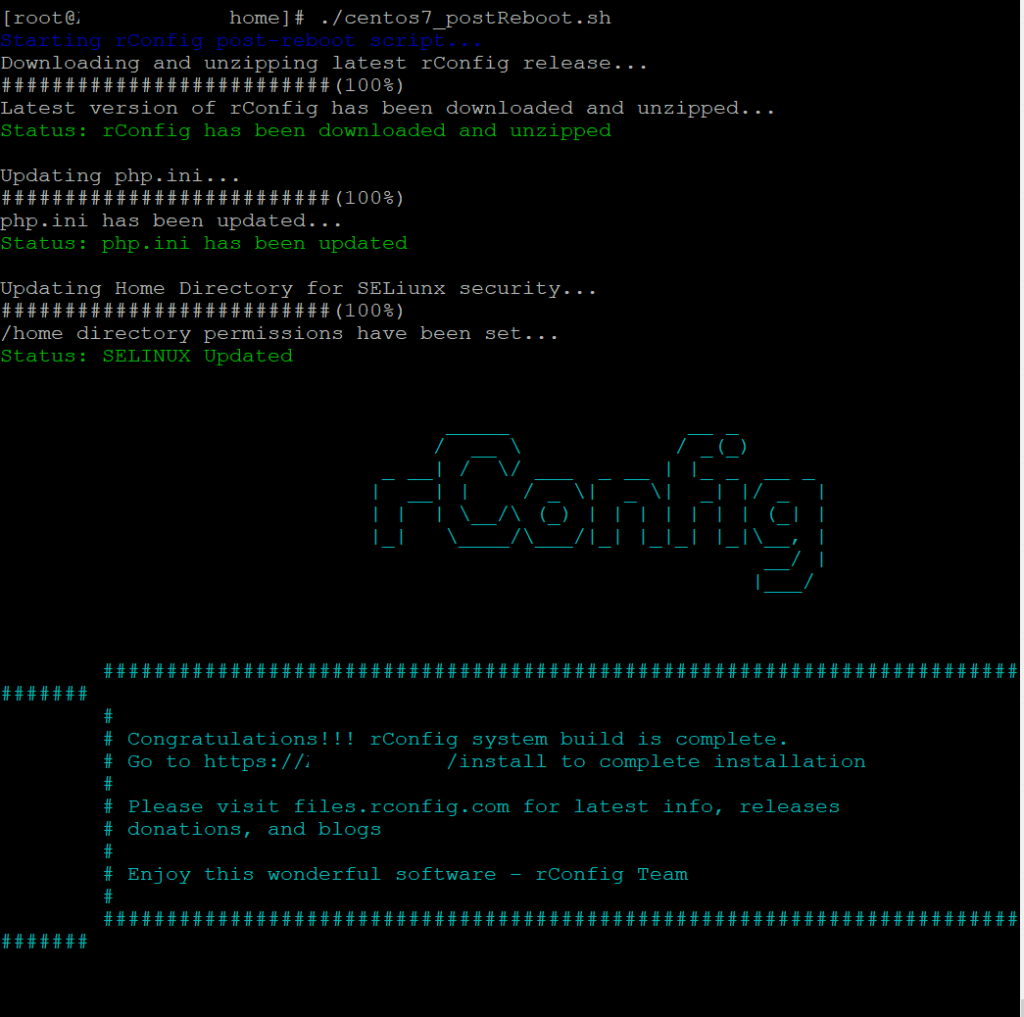
Lanciare il secondo script sempre dalla cartella Home con il comando:
|
0 |
./centos7_postReboot.sh |
Se è andato tutto a buon fine dovremmo vedere una schermata come quella sovrastante
INSTALLAZIONE DI RCONFIG
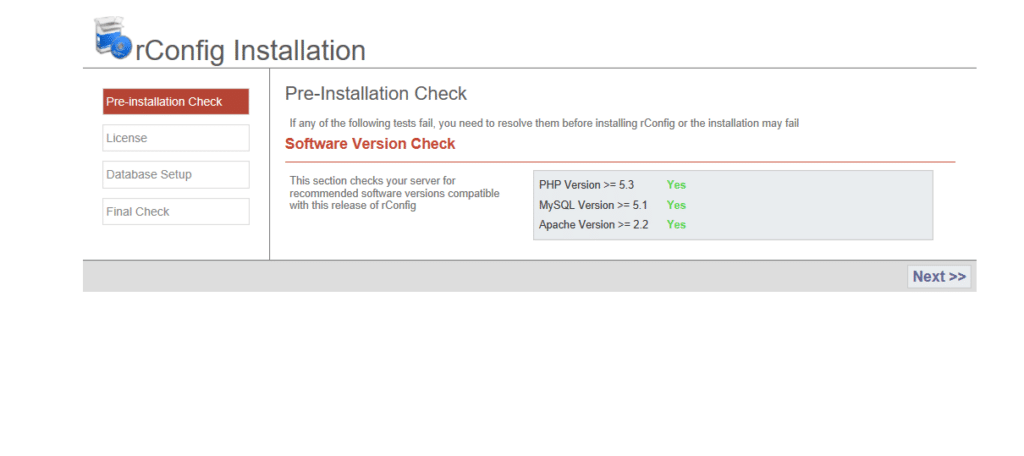
Per procedere con l’installazione richiamare in un qualsiasi browser il link:
http://IP_SERVER_o_NOME_DNS/install
Se è tutto OK clicchiamo su Next
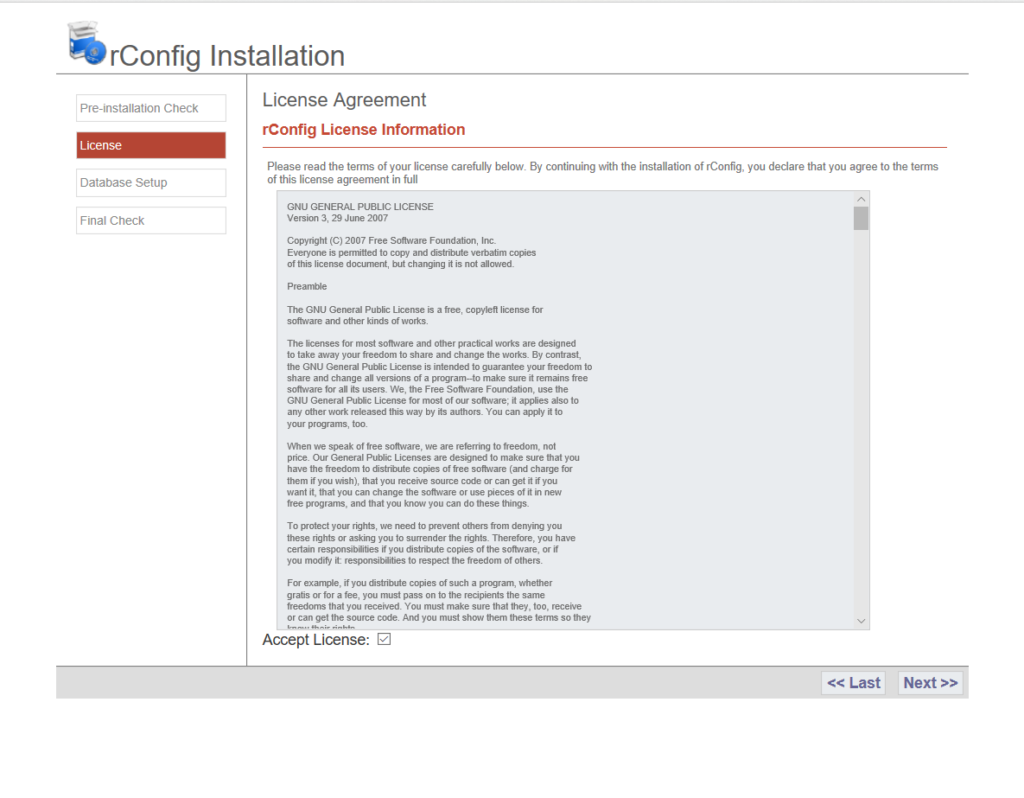
Accettare la licenza e cliccare su Next
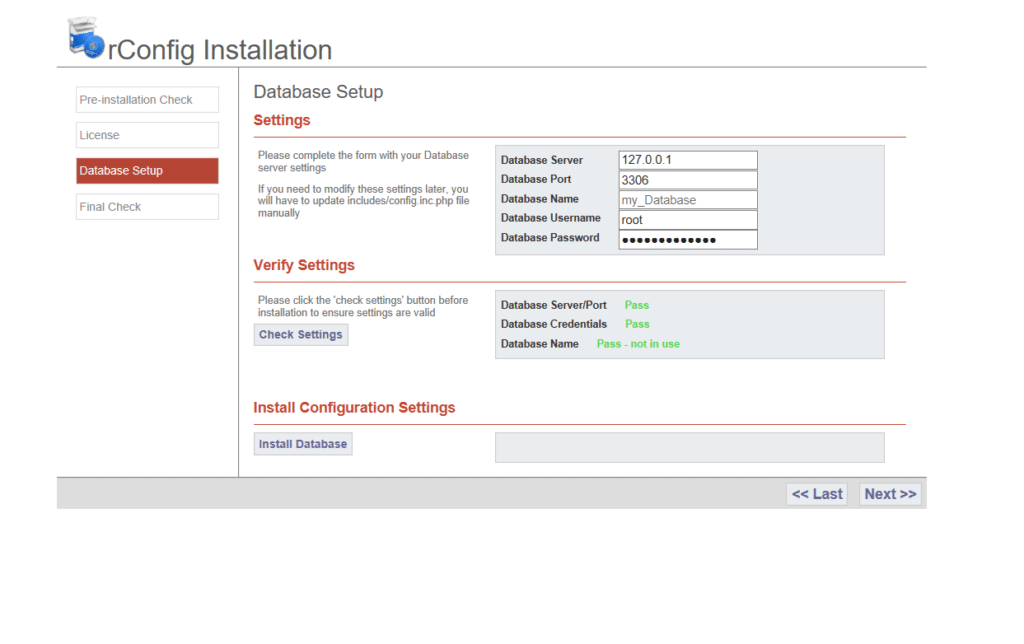
Inserire tutte le informazioni relative al nostro database quindi cliccare su Check Setting
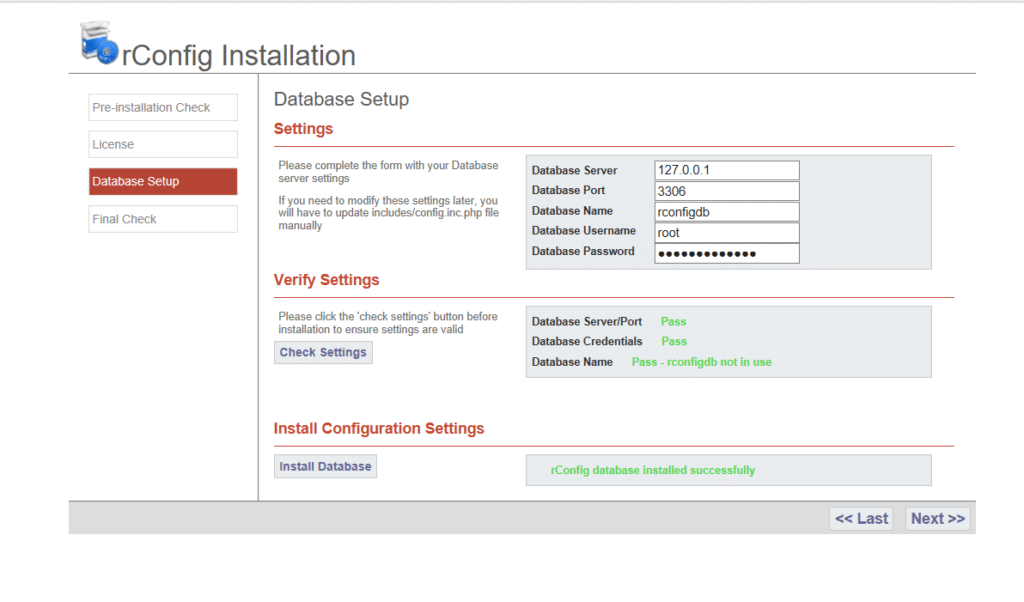
Se è tutto OK cliccare su Install Database
Se è tutto OK dovremmo vedere una schermata come quella sovrastante
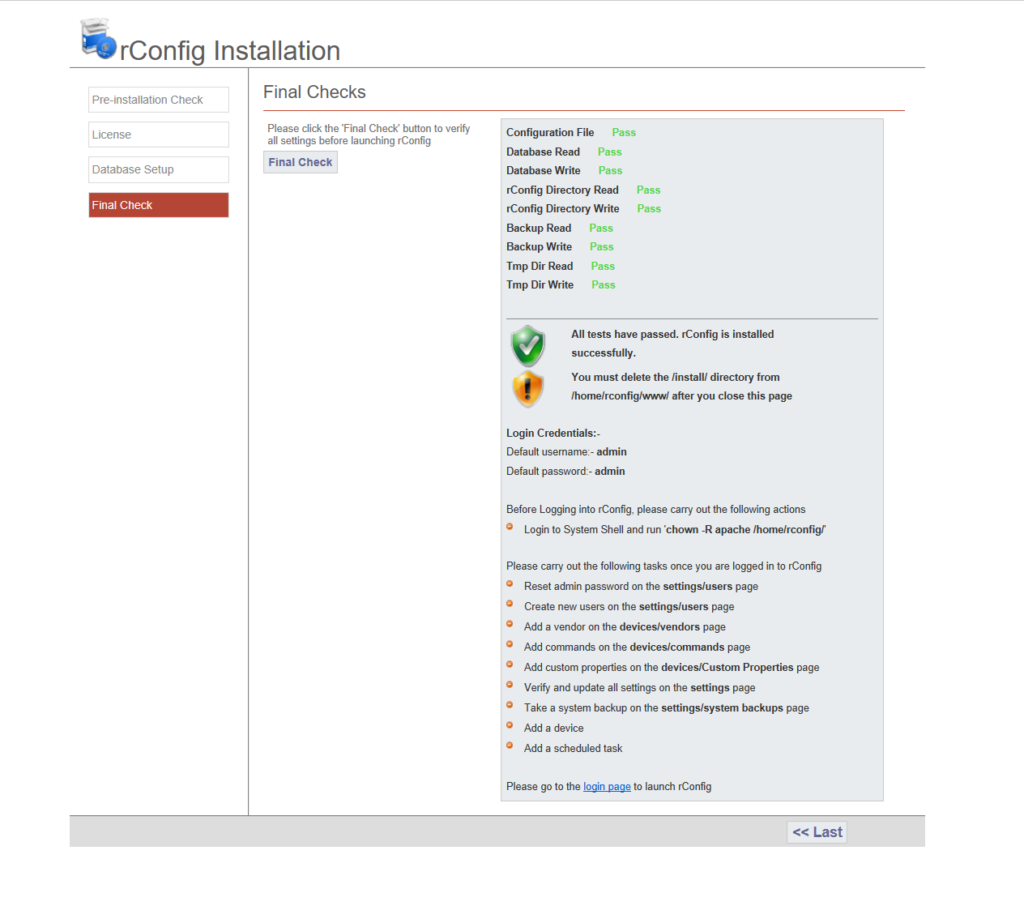
Se il check finale ha esito positivo prima di fare il login dobbiamo eseguire le seguenti attività:
1) da SSH lanciare il comando
|
0 |
chown -R apache /home/rconfig/ |
2) Cancellare la cartella si installazione con il comando:
|
0 |
rm -rf /home/rconfig/www/install |
ACCESSO AL WEB PAGE E CONFIGURAZIONE BASE
Per Accedere al server richiamare il link:
http://IP_SERVER_o_NOME_DNS/login.php
Le credenziali di default sono:
User: admin
Password: admin
Inserire le credenziali e cliccare su Login
Le attività da fare per la configurazione base sono le seguenti:
1) Modificare la password dell’utenza admin da Settings-> Users
2) Creare nuovi utenti nella pagina delle Settings-> Users
3) Aggiungere un venditore sulla pagina Devices-> Commands
4) Aggiungere i comandi sulla pagina Devices-> Vendors
5) Eseguire un backup del sistema nella pagina Settings->System Backup (admin)
6) Aggiungere un dispositivo
7) Aggiungere un’attività pianificata










![Errore in LibreNMS: Python3 module issue found: ‘Required packages: [‘PyMySQL!=1.0.0’, ‘python-dotenv’, ‘redis>=4.0’, ‘setuptools’, ‘psutil>=5.6.0’, ‘command_runner>=1.3.0’]](https://www.raffaelechiatto.com/wp-content/uploads/2024/09/Errore_in_LibreNMS_Python3_module_issue_found-1080x675.png)









0 commenti